# ReactNative
# 安装使用步骤
# 1. 搭建开发环境
开发平台: macOs 目标平台 : IOS
依赖: Node Watchman Xcode CocoaPods
我这边使用了 Homebrew 去安装依赖 Node 使用的是 nvm Xcode 使用的 App Store 商店安装
# brew install Node
brew install watchman # Watchman则是由 Facebook 提供的监视文件系统变更的工具。安装此工具可以提高开发时的性能(packager 可以快速捕捉文件的变化从而实现实时刷新)。
brew install cocoapods # CocoaPods是用 Ruby 编写的包管理器(可以理解为针对 iOS 的 npm)
2
3
# Xcode
安装好 Xcode 需要检查下配置
启动 Xcode,并在 Xcode | Preferences | Locations 菜单中检查一下是否装有某个版本的 Command Line Tools
 在 菜单 Window | Decices and Simulators 下可以看到你安装的硬件和连接的设备
# 2. 创建前端项目
我这边使用的 typescript 的模板
# npx react-native init AwesomeProject
npx react-native init AwesomeTSProject --template react-native-template-typescript
2
pod install 速度慢的终极解决方案
git config --global http.https://github.com.proxy socks5://127.0.0.1:1081
( ps:如果要恢复/移除上面设置的 git 代理,使用如下命令 )
git config --global --unset http.proxy git config --global --unset http.https://github.com.proxy
# 3. 在真机上运行
通过 usb 数据线连接设备, 一开始我用的 lighting 数据线不行 换了一根质量好的就稳定连接了 可以在 菜单 Window | Decices and Simulators 下可以看到你连接的设备
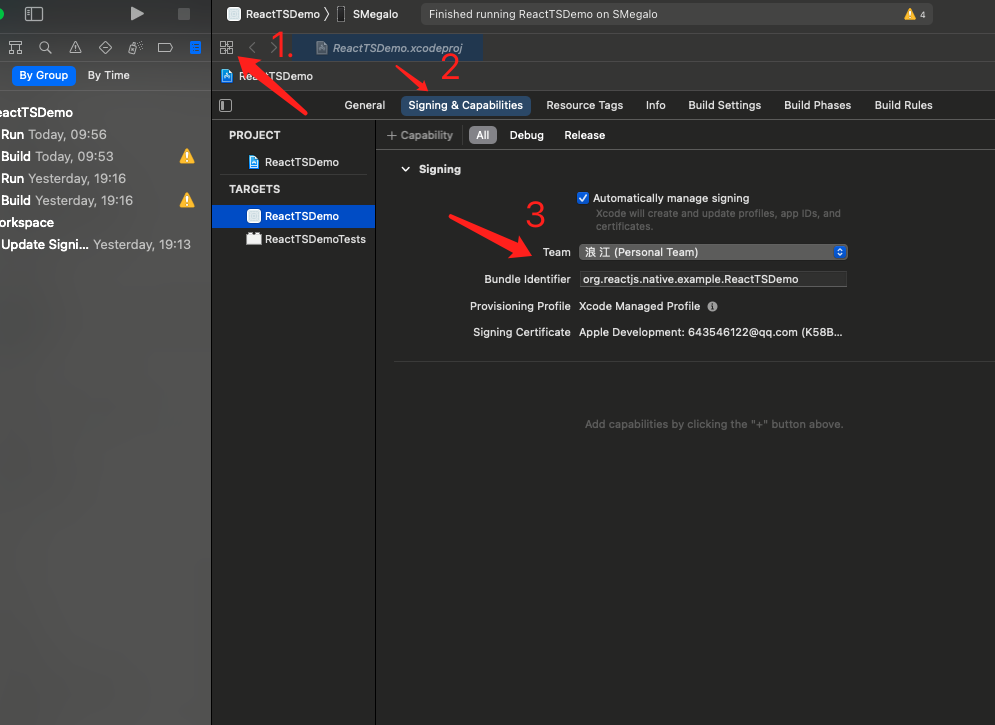
配置代码签名
如果没有 Apple developer account,先注册。
在 Xcode Project 导航中选择 project,然后选择 main target(它应该和 project 共享同样的名字)。查找"General"标签。前往"Signing"并确保在"Team"下拉下选择了开发者账号或团队。tests target(以 Tests 结尾,在 main target 下面)也需要重复同样的操作。
编译并运行
在启用开发服务器的情况下,你可以快速的迭代修改应用,然后在设备上立即查看结果。只需要在和电脑同样的 Wi-Fi 网络。摇晃设备打开 Developer menu,然后 enable Live Reload。当 JavaScript 代码改变时 app 会重载。
# 核心组件和原生组件
| RN 视图组件 | ANDROID 视图 | IOS 视图 | WEB 模拟 | 说明 |
|---|---|---|---|---|
| <View> | <ViewGroup> | <UIView> | A non-scrollling <div> | A container that supports layout with flexbox, style, some touch handling, and accessibility controls |
| <Text> | <TextView> | <UITextView> | <p> | Displays, styles, and nests strings of text and even handles touch events |
| <Image> | <ImageView> | <UIImageView> | <img> | Displays different types of images |
| <ScrollView> | <ScrollView> | <UIScrollView> | <div> | A generic scrolling container that can contain multiple components and views |
| <TextInput> | <EditText> | <UITextField> | <input type="text"> | Allows the user to enter text |
# 区分环境
# 1. 使用 Platform 模块
# Platform.OS
import { Platform, StyleSheet } from "react-native";

const styles = StyleSheet.create({
  height: Platform.OS === "ios" ? 200 : 100, // 苹果环境值就是 ios, 安卓就是 android
});
2
3
4
5
# Platform.select
import { Platform, StyleSheet } from "react-native";

const styles = StyleSheet.create({
  container: {
    flex: 1,
    ...Platform.select({
      ios: {
        backgroundColor: "red",
      },
      android: {
        backgroundColor: "blue",
      },
    }),
  },
});

const Component = Platform.select({
  ios: () => require("ComponentIOS"),
  android: () => require("ComponentAndroid"),
})();
2
3
4
5
6
7
8
9
10
11
12
13
14
15
16
17
18
19
20
# 检测版本
import { Platform } from "react-native";

// 安卓
if (Platform.Version === 25) {
  console.log("Running on Nougat!");
}

// 苹果
const majorVersionIOS = parseInt(Platform.Version, 10);
if (majorVersionIOS <= 9) {
  console.log("Work around a change in behavior");
}
2
3
4
5
6
7
8
9
10
11
12
# 2. 使用特定的文件扩展名
比如你可以在项目中创建下面这样的组件:
BigButton.ios.js;
BigButton.android.js;
2
然后去掉平台扩展名直接引用:
import BigButton from "./BigButton";
React Native 会根据运行平台的不同自动引入正确对应的组件
# shaodw 升级问题
react-native-shadow (opens new window) 升级 react-native-shadow-2 (opens new window)变化很大参考
react-native-shadow:
const shadowOpt = {
  height: disabledReason ? couponHeight + 20 : couponHeight,
  width: Dimensions.get("window").width - 30,
  color: "#535459",
  border: 6,
  radius: 4,
  opacity: 0.05,
  x: 0,
  y: 0,
  style: {
    marginHorizontal: 15,
    marginVertical: 7,
    // marginBottom: 0,
    position: "relative",
  },
};
2
3
4
5
6
7
8
9
10
11
12
13
14
15
16
react-native-shadow-2:
const shadowOpt = {
  size: [
    Dimensions.get("window").width - 30,
    disabledReason ? couponHeight + 20 : couponHeight,
  ], // width, height合并进 size
  startColor: "#e9e9e9", // opacity和color合并成 startColor
  distance: 6, // border换成 distance
  radius: 4,
  offset: [0, 0], // x, y合并进 offset
  containerViewStyle: {
    marginHorizontal: 15,
    marginVertical: 7,
    // marginBottom: 0,
    position: "relative",
  }, // style 换成 containerViewStyle
};
2
3
4
5
6
7
8
9
10
11
12
13
14
15
16