# 远程组件
这里记录下我是如何通过 Module Federation (opens new window) 实现远程组件配置化的
# 动机
我们在开发低代码的过程中, 在原生可用的组件不满足实际业务场景的情况下, 我们就需要自己开发组件然后再低代码的项目中加载并使用
基于这个需求, 我想到了 webpack5 新的 plugin 模块联邦(Module Federation) 正好可以满足我的期望, 并且跟 npm 加载的方式完全不一样, 可以更加灵活的动态加载远程组件
# 思路
- 我们首先需要一个远程组件开发的模板仓库, 我们可以在这里开发我们的组件, 包含低代码左侧的配置, 和中间的预览组件, 还有右侧的编辑配置
- 然后我们需要在低代码后台维护一个远程组件列表, 里面包含组件的名称和版本还有组件打包后的路径地址, 版本是可以自定义配置到底使用哪个版本
- 当我们做完远程组件列表后, 我们就可以自己开发好组件然后导报上传到我们的远程组件后台列表中
- 当我们进入搭建页面的时候, 首先动态加载左侧的远程组件, 然后中间的预览部分是另外一个项目, 所以中间的预览项目需要自己加远程组件的预览部门, 右侧编辑配置当我们在选中组件的情况下, 初始化的时候判断是否是远程组件, 如果是就动态远程加载右侧的组件配置
# 概览
低代码平台包含以下项目
- slow-components 基础组件库 (opens new window)
- slow-control 低代码前端后台管理系统 (opens new window)
- slow-render 低代码 h5 (opens new window)
- slow-remote-comp 低代码远程组件模板 (opens new window)
- slow-code-node 低代码 node 后端 nestjs (opens new window)
最后的项目成品请看 在线地址 (opens new window)
# 实现
# 远程组件模板
模板这边不做过多描述, 主要就是使用了 mf 提供了三个数据
exposes: {
  fields: "./src/schema/fields.ts", // 组件的概览
  edit: "./src/schema/edit.tsx", // 右侧组件的编辑配置
  preview: "./src/schema/preview.tsx", // 中间预览组件
}
2
3
4
5
然后再打包的时候不打包如入口文件, 只打包 mf 的代码. 并且在打包结束后, 通过自定义 plugin 在 emit 声明周期(生成资源到 output 目录之前触发,这是一个异步串行 AsyncSeriesHook 钩子参数是 compilation) 对打包的结果进行压缩, 压缩使用的是 jszip
# 服务端
首先我们使用 nestjs 初始化 模块 RemoteComp 用于管理我们的组件, 每个组件也有自己的版本号, 所以组件和版本之间是一对多的关系
点击
@Entity()
export class RemoteComp {
  @PrimaryGeneratedColumn()
  @Expose()
  id: number;

  @Column({ unique: true })
  @Expose()
  name: string; // 远程组件英文名

  @Column({ unique: true })
  @Expose()
  zhName: string; // 远程组件中文名

  @Column()
  @Expose()
  currentVersion: string; // 当前正在应用的版本号

  @Column({ unique: true })
  @Expose()
  path: string; // 远程组件路径

  @OneToMany(
    () => RemoteCompVersion,
    (version) => version.comp
  )
  versions: RemoteCompVersion[]; // 远程组件版本
}
2
3
4
5
6
7
8
9
10
11
12
13
14
15
16
17
18
19
20
21
22
23
24
25
26
27
28
@Entity()
export class RemoteCompVersion {
  @PrimaryGeneratedColumn()
  @Expose()
  id: number;

  @Column()
  @Expose()
  name: string; // 远程组件英文名

  @Column()
  @Expose()
  version: string; // 版本号

  @Column({ unique: true })
  @Expose()
  path: string; // 远程组件路径

  @ManyToOne(
    () => RemoteComp,
    (remoteComp) => remoteComp.versions
  )
  @JoinColumn()
  comp: RemoteComp;
}
2
3
4
5
6
7
8
9
10
11
12
13
14
15
16
17
18
19
20
21
22
23
24
25
# 我们主要看下新增组件接口功能
点击
async uploadWithCreate(
    file: Express.Multer.File, // 上传的打包文件
    createRemoteCompDto: CreateRemoteCompDto, // 包含组件的基本信息
  ) {
    return new Promise(async (resolve, reject) => {
      try {
        const { originalname } = file;
        const { version, name } = createRemoteCompDto;
        // 基于项目根路径存储的路径
        const cwdPath = `/uploadRemoteComp/${name}/${version}`;
        // 当前电脑路径
        const fileName = join(__dirname, `../../..${cwdPath}`);

        // 创建保存压缩文件的文件夹
        try {
          await mkdir(fileName, { recursive: true });
        } catch (error) {
          if (error) {
            throw new HttpException(
              '文件夹创建失败',
              HttpStatus.NOT_ACCEPTABLE,
            );
          }
        }
        // 压缩文件的保存路径+文件名
        const file_path_name = join(fileName, originalname);

        // 保存zip文件
        const writeStream = createWriteStream(file_path_name);
        writeStream.write(file.buffer);

        // 标记写入完成
        writeStream.end();

        writeStream.on('finish', async () => {
          console.log(`${file_path_name} 写入完成`);

          // 解压zip文件
          try {
            await extractZip(file_path_name, fileName);
          } catch (error) {
            console.log('error', error);

            reject(
              new HttpException(
                `解压压缩文件 ${originalname} 失败`,
                HttpStatus.NOT_ACCEPTABLE,
              ),
            );
          }

          try {
            // 数据库创建数据
            await this.create({
              ...createRemoteCompDto,
              path: `${cwdPath}/${compressingConfig.pathKey}`,
            });

            resolve('success');
          } catch (error) {
            reject(new HttpException(error, HttpStatus.NOT_ACCEPTABLE));
          }
        });
      } catch (error) {
        reject(error);
      }
    });
  }

  async create(
    createRemoteCompDto: CreateRemoteCompDto & CreateRemoteCompVersionDto,
  ) {
    const { version, name, zhName, path } = createRemoteCompDto;

    // 通过 createQueryRunner 方式保证更新一对多的数据的时候假如说出现报错 可以自动回滚对数据库的操作
    const queryRunner = this.connection.createQueryRunner();
    await queryRunner.connect();

    // 初始化组件
    const remoteCompData = new RemoteComp();
    remoteCompData.name = name;
    remoteCompData.zhName = zhName;
    remoteCompData.currentVersion = version;
    remoteCompData.path = path;

    // 初始化组件版本
    const remoteCompVersionData = new RemoteCompVersion();
    remoteCompVersionData.name = name;
    remoteCompVersionData.version = version;
    remoteCompVersionData.path = path;

    await queryRunner.startTransaction();

    try {
      // 新建远程组件
      const newRemoteComp = await queryRunner.manager.save(remoteCompData);
      // 新建远程组件版本管理
      const newRemoteCompVersion = await queryRunner.manager.save(
        remoteCompVersionData,
      );
      // 将组件版本和组件进行关联
      newRemoteComp.versions = [newRemoteCompVersion];
      await queryRunner.manager.save(newRemoteComp);
      await queryRunner.commitTransaction();
    } catch (error) {
      await queryRunner.rollbackTransaction();

      return Promise.reject(error);
    } finally {
      await queryRunner.release();
    }

    return;
  }
2
3
4
5
6
7
8
9
10
11
12
13
14
15
16
17
18
19
20
21
22
23
24
25
26
27
28
29
30
31
32
33
34
35
36
37
38
39
40
41
42
43
44
45
46
47
48
49
50
51
52
53
54
55
56
57
58
59
60
61
62
63
64
65
66
67
68
69
70
71
72
73
74
75
76
77
78
79
80
81
82
83
84
85
86
87
88
89
90
91
92
93
94
95
96
97
98
99
100
101
102
103
104
105
106
107
108
109
110
111
112
113
114
115
# 至此, 我们的服务端就开发好了 已经开发出了新增组件的接口, 并且后续开发的更新接口也是支持修改版办号的
# 后台管理系统(前端)
我们首先需要一个 crud 的页面 这里已经开发好了 远程组件 (opens new window)
然后我们在项目管理 (opens new window)里面新建项目, 并点击搭建进入到我们的低代码搭建页面
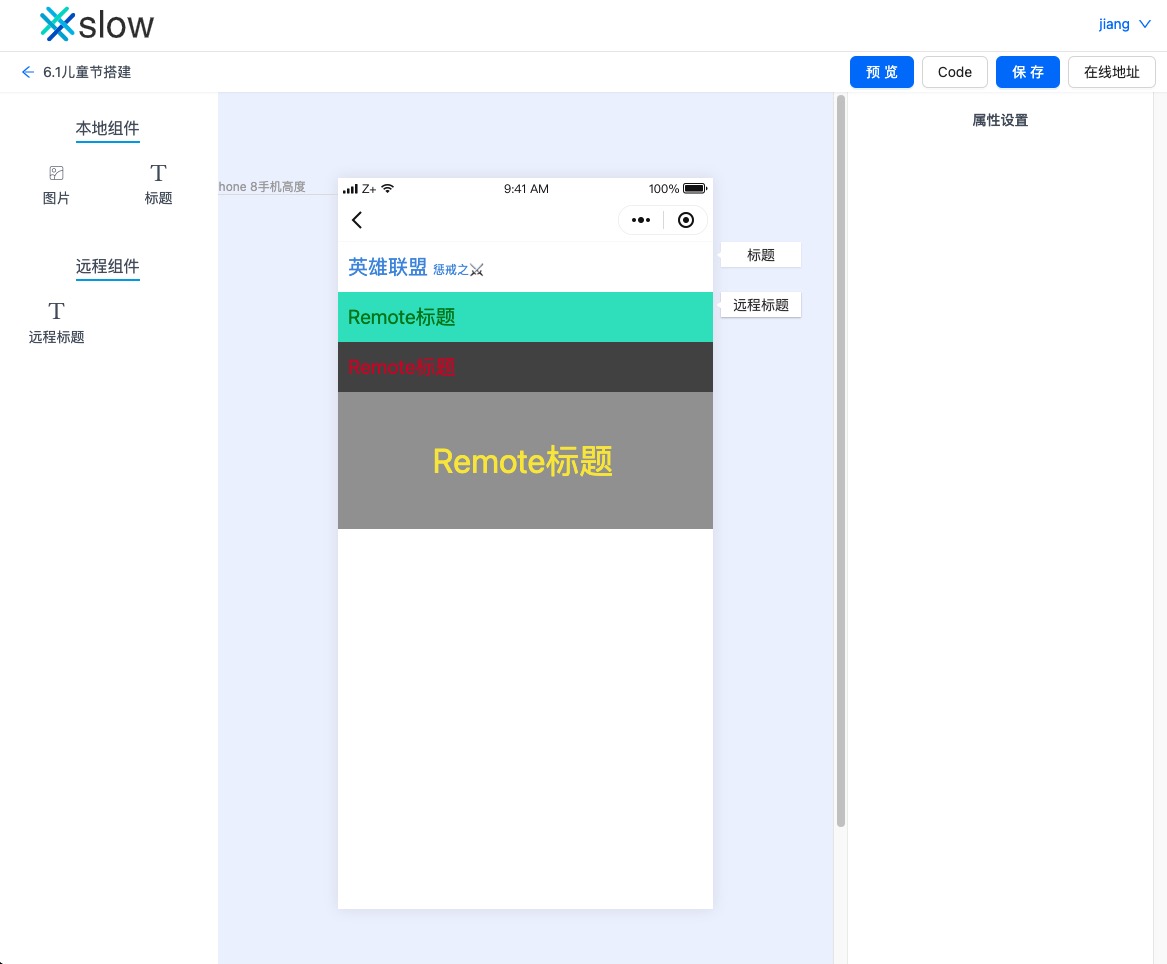
从上图 Key 看到, 左侧是我们的组件列表, 中间是页面的预览, 右侧的选择组件的属性设置功能
我们这里说下如何去远程加载 mf 组件
点击
我们主要是通过 webpack 的 module-federation 下的工具库 @module-federation/utilities 做远程加载组件
import { isDev } from "@/utils/env";
import { importRemote } from "@module-federation/utilities";

// 加载左侧配置
export function initRemoteFields({ path, name }: any) {
  return new Promise((resolve, reject) => {
    const app2Utils = importRemote({
      url: isDev
        ? (process.env.REACT_APP_REMOTE_COMP as string)
        : `${process.env.REACT_APP_REMOTE_COMP}/${path}`,
      scope: name,
      module: "./fields",
    });
    app2Utils
      .then((res: any) => {
        resolve(res.default);
      })
      .catch((err) => {
        reject(err);
      });
  });
}

// 加载右侧编辑属性配置
export function initRemoteEdit({ path, name }: any) {
  return new Promise((resolve, reject) => {
    const app2Utils = importRemote({
      url: isDev
        ? (process.env.REACT_APP_REMOTE_COMP as string)
        : `${process.env.REACT_APP_REMOTE_COMP}/${path}`,
      scope: name,
      module: "./edit",
    });
    app2Utils
      .then((res: any) => {
        resolve(res.default);
      })
      .catch((err) => {
        reject(err);
      });
  });
}

// 加载中间预览配置
export function initRemotePreview({ path, name }: any) {
  return new Promise((resolve, reject) => {
    const app2Utils = importRemote({
      url: isDev
        ? (process.env.REACT_APP_REMOTE_COMP as string)
        : `${process.env.REACT_APP_REMOTE_COMP}/${path}`,
      scope: name,
      module: "./preview",
    });
    app2Utils
      .then((res: any) => {
        resolve(res.default);
      })
      .catch((err) => {
        reject(err);
      });
  });
}
2
3
4
5
6
7
8
9
10
11
12
13
14
15
16
17
18
19
20
21
22
23
24
25
26
27
28
29
30
31
32
33
34
35
36
37
38
39
40
41
42
43
44
45
46
47
48
49
50
51
52
53
54
55
56
57
58
59
60
61
62
# 至此 其实我们的远程组件实现已经基本完成了 代码的实现请看仓库
这个地址服务端到期时间 2023-06-29 后面会更新
项目目前也比较粗糙, 目的是提供一些思路, 需要持续迭代慢慢优化.